- There are combinations of "Fabric material" and "Ink jet print pattern" which has possibility that the "Moire fringes" appears. Please refer the following information to reduce the Moire fringes.
【Recovery Procedure】
1. Check the media feeding amount
You might be able to reduce the Moire fringe if you readjust the media feeding amount.
Refer to the following manual to see more details.
『Operation manual 』-[Chapter 3]-[Setting Media Correction]
2. Try to print with “larger print pass”, or “more high resolution”.
The “Moire fringes” usually appears when you selected “smaller print pass” or “Low resolution”.
Ex1) If you printed with “4pass” and had “Moire fringes”,
⇒select “larger print pass” such as 8pass or the other larger numbers you can select.
Ex2) If you printed with “Low resolution” such as 600x300dpi and had the “Moire fringes”,
⇒select “higher resolution” such as 600x900dpi
3. Try to use “Moire Reduction” function.
This is a function to reduce the Moire fringe which changes the media feeding amount more inconstantly. Please see the following manual to see more details.
『Operation manual 』-[Chapter 3]-[When there are Moire fringes]
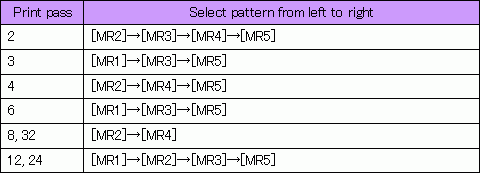
There are five “Moire Reduction” patterns (MR1-MR5).
Choose a pattern from MR1-MR5 depending on the print pass you use, and print the same print image one more time to check if it reduced the Moire fringe or not
Please follow the following steps
Before you start doing this procedure, you have to done above “1”.
① [FUNCTION key]-[SETUP]–[Select:TYPE 1]–[Moire Reduction]–[Select:MR1-MR5]
② You choose a pattern from MR1 – MR5, and hit .
Please see the list below to decide which pattern you should select.
Ex) If you print with “6 pass”, select “MR1” at first. After that you will print again to see the result. But if the Moire fringe was not reduced, select “MR3” and print again.

③ Trim the print data where is the area that Moire fringe appears
You can trim it by MIMAKI Raster Link Pro.
※ 1. If you make this trimmed data, you do not have to print whole image again, so you can save your time, media and ink.
※ 2. Change the print origin of Y direction of the trimmed data to the origin where you could see the Moire fringe on the original print result.
④ Make a ripped data by RIP software
Make it by “RIP only” function if you use MIMAKI Raster Link Pro
⑤ Print it with “Print only”
⑥ If the Moire fringe is not reduced enough, try to print it with the next pattern.
⑦ Keep doing this and select the most effective pattern for the Moire fringes.
